


1 Introduction
Integrating VMware Horizon Mirage with
Horizon FLEX Server will perform centralized Image management, with which we
can take timely backups, apply patches etc to the restricted Horizon FLEX Virtual
Machine.
2 VMware Horizon Mirage and Flex Lab Environment
Lab Environment is setup with a single VMware
ESXi Host, Desktop, Laptop and Guest Machines.
Hardware
Dell Desktop OptiPlex 9020 : ESXi Host
Horizon Mirage & Flex Server : Virtual Machine
Flex Client (VMware Workstation Player) : Dell
Desktop OptiPlex 9020 & Dell
Latitude
E5540 Laptop
Network Connection : Physical Switch (Dell 2824) & VSwitch
Network Speed :
Read: 500 Mbps
: Write: 700 Mbps
OS : Windows 2012 R2 & Windows 7
VMware ESXi :
6.0.0 Update 2
VMware Horizon Mirage : 5.8.0.30302
VMware Horizon Flex Server : 5.8.0.30302
VMware Workstation Player : 12.1.0
Lab Network

1. Virtual Machine for Mirage Server, Mirage Management Server, Mirage Web Manager & Flex Server
2. Virtual Machine for creating Flex Image and Reference CVD
3. Virtual Machine for creating App Layer.
3 VMware Mirage and Flex Integration Work Flow
4. The below flowchart shows the work flow to
create a Flex Virtual machine and enable Image management through VMware
Mirage.

4 Step to configured Flex Image and enable automatic backup in Mirage
4.1 STEP 1
Building
Virtual Machine Image for Flex Server.
1. Install VMware Workstation pro
2. Create Virtual machine and Install Windows 7
3. Install VMware Tools and reboot
4. Enable Administrator Account and Log with
Administrator Account
5. Delete all other users
6. Install VMware Mirage Client
7. Verify the Virtual machine is showing in
Pending Device section of VMware Mirage
Server


8. Sysprep the Virtual machine and Shutdown
9. Encrypt the Virtual machine with password
10. Enable Restriction password, configure Flex
Server URL in Restriction server as https://<FlexserverFQDN> and Check Server.


11. Export the Virtual Machine to TAR file and
extract the .VMX file
12. Upload the TAR file to Web server and copy
the Link
Now we have a Virtual
Machine Image to register in Horizon Flex Server
4.2 STEP 2
To
protect the users Flex Virtual Machine using Image Management, we are
integrating the Flex Image with Horizon Mirage Server. The Horizon Mirage
Server will perform centralized Image management, with timely backups for the
Flex Virtual Machine. We are creating a Base layer in Mirage Server and
applying this Base Layer to the Flex Virtual machine during the Flex Virtual
Machine Entitlement Policy creation.
For
creating a Base Layer we required to create a Reference CVD in VMware Mirage
Server. This Reference CVD is used in later to update the captured Base Layer. For
Reference CVD we are using the same Virtual machine which was used to create
Flex Virtual Machine Image.
Once the Virtual machine is Powered On and connected to Mirage Server, follow the bellow steps to create a Reference CVD.
1. Power on the Virtual Machine which was
created for Flex Image
2. Proceed with the initial Configuration as it
is SysPreped.
3. Verify the Virtual Machine is showing in
Pending Device section of VMware Mirage Server web console.


4. Click Create
Reference CVD and Choose Base Layer.


5. Select the CVD Policy and Continue.
6. In Base Layer Selection wizard, Choose “Do
not use a base layer”.
Note:
As we are creating the first Base Layer, there will be no Base layer in the
List.
7. Select the Target Volume for storing
Reference CVD as Automatic.
8. Validation process will be performed and if
it passed then Continue.
9. Verify the summary for the new Reference CVD
and Click Finish to Complete.
10. The Virtual machine will be moved to CVD Inventory
and will start the Upload process.


11. Status can also be verify in Mirage Client.


12. Once the Virtual Machine is completely uploaded
and sync with the Server, the progress Status will be “100 %” and Activity Status will be “Idle”


13. Shutdown the Virtual Machine and keep it for
further Layer Update.
Note:
Now we have a reference Image for creating a Base Layer Image. This Image is
required for future Base Layer Updates.
4.3 Step 3
This
Step is to create a Base Layer from the above created Reference CVD. Once the
base layer is capture, we can assign this base layer to the Flex Virtual
Machine.
Create
Base Layer from Reference CVD
1. Navigate to CVD Inventory in Mirage Web
console
2. Select the Created CVD Reference which was
create on Step 2
3. Select
Capture Base Layer from the options.


4. Proceed with the Window.
5. Create a New layer and Input the details.
Note:
Same process is done for updating the layer. We can install the software
updates, Patches, new Software’s in the Reference CVD and update the CVD.
Capture Layer from the updated CVD and choose Option “Update an existing Layer
and choose the existing layer.
6. Validation process will be executed and
continue.
7. Verify the Summary and Click Finish to
Complete.
8. Verify the progress in CVD Inventory Tab.


9. Captured Base layer progress can be verified
under Task Tab


10. Once the process is completed and verify the Base
Layer is created under Layers Tab.


Now we have a Base Layer Image for deploying
to Flex Virtual Machines. The base layer is the first thing deployed to a
client machine if it’s completely managed by Mirage.
4.4 Step 4.
Once
the CVD Policy and Base Layer is configured in Mirage Server, next is to
register the Flex Virtual Machine, entitle the users and configure the above
created Base Layer to Flex Virtual Machine in Flex Server.
If
the Virtual machine is configured with Mirage Client, then additional option “manage
the virtual machine with Mirage” will be populated in new entitlement wizard.
This
step involve the Registration of Flex Virtual Machine, creation of entitlement
Policy and configure the Flex Virtual machine to manage with Mirage Server in
Flex Server Web Console.
1. Log in to Flex Server Web Console and Navigate
to Images Tab.
2. Click New to add a Virtual Machine Images


3. Click Select next to
the Select Image File text box and browse to the virtual machine
configuration (.vmx) file for the source virtual machine.
4. Enter the Virtual machine TAR file location
in Image URL filed.
5. Click OK to Finish.
6. Navigate to Entitlement Tab.
7. Create new entitlement for the Flex Image
8. Add required Members and Choose the Flex
Policy
9. As the Image is configured with Mirage
Client, the wizard will ask an Option for Manage with VMware Mirage window.
Choose “Use VMware Mirage for disaster
recovery and image management scenarios”.


10. Select the CVD Policy
11. Select the Base Layer (created on Step3 )
12. Select App Layer if applicable.
13. Validation Process will complete and continue
to Finish the process.
Now we
have a Flex Virtual Machine image which is managed by VMware Mirage for backup
and disaster recovery.
4.5 Step 5
This
step will provide the details, how clients access the Flex Virtual machine and
auto assigned to Mirage Server for backup.
1. Install VMware Workstation Player in client
machine
2. Connect to Horizon flex server from VMware
Workstation Player
3. Download the Image.
4. Provide the Encryption password and Log into
the Virtual machine.
5. Once the Virtual Machine is connected to
Mirage Server, the Virtual Machine will be in the Pending Device tab of VMware
Mirage Web Console and the status will be Pending Registration.


6. On the
Virtual Machine a windows will prompt for Machine Registration in Mirage
Server.


Provide the Domain credentials and Click OK
7. Verify the Virtual machine is registered,
auto centralized and moved to CVD inventory Tab in Mirage Web Console.
8. Verify the Mirage Client Start updating the
Layer Image and status in Mirage Server as initializing upload.


9. Once the Layer Update is completed, the
Virtual machine will prompt for Reboot.


10. Click Restart Now
11. During the reboot, the Virtual Machine will
be updated with base layer.

12. Once the Virtual Machine is active and sync
with Mirage Server, CVD will be created for the Virtual Machine in the CVD
Inventory and snapshot will be captured based on the Policy


This
process will be perform for all Flex Virtual machine which is downloaded and connected
to Flex Server. All the user Virtual Machines CVD will be created and these
Virtual machines will be under Mirage Image Management.
5 Capturing an Application Layer
Creating and updating application layers is
done in four steps.


1.
Power on the Virtual
machine which is prepared for App Layer Capture.
2.
Once Virtual Machine is
connected to Mirage Server, Virtual Machine will be in the Pending Device tab
of VMware Mirage Web Console and the status will be Pending assignment.


3. Click Create
Reference CVD and Choose App Layer


4.
Select the CVD Policy
5.
Choose the Target Volume to
save the App Layer
6.
Validation process will
execute and continue to Finish.
7.
Once the wizard is
completed, Virtual Machine will be moved to CVD Inventory and start
initializing the app layer recording.


8.
Virtual Machine will pop up
with a window initializing app layer recording


Note: During this time, the Mirage is
capturing the system state which later compare to the system state after
installation of application.
9.
Once the initializing
completed, Virtual Machine is ready to capture application installation.


10. Install the required application during the
recording time.
As
an example I have installed Libra Office and Windows Security Patch KB3170455.
11. Once
the installation is completed, Click Finalize App Layer Capture.


12. Mirage will update the
required information and will display the recorded Application


13. Create a New App layer and Input the details.
14. Continue the Wizard to Finish.
15. After that Mirage will start App layer
Capture


16. Once the App layer is capture completed, the
captured App layer will be in the Layers Tab.


6 Deploying an Application Layer
1. Select the Machine for App layer deployment
from the CVD Inventory tab.
Note: Selected Machine is not installed with
Libra Office and Windows Security Patch KB3170455.


2. Select Assign App Layer


3.
Assign App Layer wizard
will pop up and choose the Application Layer. Select Download option as
Download and apply layer


4.
Continue the wizard and
Finish.
5.
Once the App layer is
assigned, Mirage will initialize Layer update.

6.
Verify the update in Mirage
Client


7.
Once the App layer update
is completed, Virtual Machine will prompt for reboot.


8.
Once the Machine is
rebooted, Application will be installed in the machine.


Note:
Application Layer can’t deliver Windows OS components – such as .Net Framework,
Windows Updates, Windows licenses, user accounts etc. In most cases, these can be covered through
Base Layers though.
Application
layers can only be deployed to Mirage clients which have a base layer deployed.
Above test shows that the Libre Office get
installed, but Windows Patch KB3170455 not get deployed.
7 Migrate a CVD to a Replacement Device.
There
will be situation where Virtual machine get crashed and not able to boot. In this situation we can utilize the option
hardware migration to restore the CVD to another Virtual Machine, so that the
user Data and all application will be restored without data loss. Later this
Virtual machine can be assigned to the user and it will under protection.
Physical
Machine migration also can be done with hardware migration, but this process
require Driver profile to be created for the Physical machine driver. `
1.
Log into VMware Mirage Web
Console.
2.
Select the CVD of Machine
which need to be migrated to another Device.
3.
Select Archive and Click Ok to archive.
4.
Verify the CVD is in
Archive status.
5.
Power on the replacement
Machine and connect to Mirage Server
6.
Replacement Machine will be
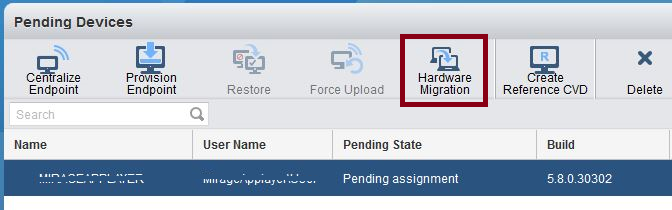
in the Pending Device Tab, Status as pending Assignment.
7.
Choose Hardware Migration.

8.
Select the Archived CVD
from the list.


9.
In Migration Option Choose
“Full System Migration”, we can choose migrate application, user data and
settings or only user data and settings.


10. Maintain
current Base Layer
11. Keep same CVD name
12. Validation process will execute and continue
next to Finish.
13. Machine will be moved to CVD Inventory and
start initializing restore.


13. Once the restore process is completed, the
Virtual machine will prompt for Reboot.


14. Click Restart Now
15. During the reboot, the Virtual Machine will
get updated.


16. Once the Virtual Machine is rebooted, all
user data and application in the CVD will be restored. Virtual machine will be
in sync with Mirage Server and CVD will be created for the Virtual Machine in
the CVD Inventory with same name. Snapshot will be captured based on the Policy.


0 comments:
Post a Comment